--------------------------------------------------------------------------------
An Android emulator lets you run Android on a Windows, Mac or Linux. This allows you to gain access to Android features and apps without needing to buy an Android device, which is great news for people who don’t really want to buy a new Android device just for testing the app or any other product they are developing.
Like any other software, an Android emulator can be easily downloaded and installed, then configured to boot up an emulator instance (which is something like a Chrome or Firefox browser tab).
In this post, we will be briefly touching on the usages and advantages of Android Emulators then detailing the top 5 Android Emulators you can try out.
Advantages of Android Emulators
Android Emulators let you enjoy all of Android without leaving a hole in your pocket. Nonetheless not all emulators are created equal; they vary in terms of features and specifications.
Let’s look at the advantages first to sort of give you an idea of what you can expect from an emulator.
1. Run stock Android on a PC, Mac Or Linux
You can experience Google’s stock version of Android using Android Emulators – whether it’s hacking the developer options, switching quick toggles, playing its Flappy Bird game or testing self-developed apps. It’s a good platform to check out the original Android OS in cases where your device manufacturer is one of those that provide a custom Android instead.
2. Select any Android version, past or present
You can select any Android version (Lollipop, Marshmallow or classic Gingerbread). Since the emulator is just a software running on your system, you’re open to select and use any Android release.
You’re also never restricted to use the factory version provided by the device’s manufacturer (since there is no physical device) having to wait for an OTA update for the latest Android version to be made available by the manufacturer. Just pick the version you want once it is made available.
3. You can select any hardware specification
You can choose any hardware specification – like that of Google Nexus 5 or 6 (smartphones), Samsung Galaxy S5 or S6 (smartphones), Google Nexus 7 or 9 (tablets), etc. The only limitation is the power level of your desktop machine, for example, if it has 4 GB RAM then you can’t allot 3 GB for the emulator.
The standard requirements for running Android Emulators are dual-core Intel or an AMD processor with virtualization support, 4 GB of RAM and 10 GB of disk space, though less powered ones can run older Android versions (there’s something for everyone).
You can even choose a customized hardware specification using preferred values for processor, RAM, storage and more. You can create separate emulators for different scenarios, for example, high-end games may require more RAM and data keeping will require more storage.
4. Bricking isn’t a total loss
Because it’s a software running as a virtual hardware on your system, any damage the emulator experiences, e.g. bricking, will not be of total loss (to you), except for maybe the data inside the emulator’s memory.
All you need to do (in most situations) is to delete all the device’s files and create a new emulator device from scratch. You also don’t have to worry about hardware damage like those brought about from dropping the device or getting it wet.
5. Use Android’s social apps while working on Desktops
Perhaps the most attractive reason to get Android on your desktop is that you can use Android’s social apps (eg WhatsApp, Telegram, Facebook’s Messenger) like you would on your Android device. You can chat, make voice or video calls with Skype, edit your next blogpost, work on a spreadsheet and coding all at the same time.
6. Play high-end games
You can also play Android games on your PC or iMac. With Android emulators, you no longer need high-priced smartphones to enjoy your favorite HD gamesbecause you can easily enjoy most of those games on your desktop without spending single penny from your pocket. These emulators offer good support for most of apps and games, and a few even offer joystick or phone support for gaming control.
7. Multi-task between PC/iMac and Android apps
You can multi-task between PC/iMac and Android apps using an emulator on your desktop. You can simply run and switch between a few desktop apps while running mobile apps on your emulator. Some of the emulators even support a drag-and-drop feature that eases the task of moving text or data between your PC/Mac/Linux and the emulator.
5 Best Android Emulators
If you are determined to get yourself an Android emulator, here are the best 5 picks in the field.
BlueStacks (Free)
BlueStacks, one of the first few third-party Android emulators, supports camera and microphone integrations for making voice and video calls via VoIP apps like WhatsApp, Skype and others. Its features include drag-and-drop supportbetween desktop and emulator for file sharing, sync between desktop emulator and an actual Android device, localizations, Android-on-TV capability and many more.

The emulator integrates well with PCs and iMacs to give the ultimate gaming experience with native graphics support and easy multitasking between different apps or games like a native Android. Compared to other such emulators, it offers more compatibility support for apps and games, and avails a bigger Android interface than any phone or tablet.
Andy (Free)
Andy gives you easy sync between your desktop (running Andy) and an Android device. It also allows you to easily access the desktop’s filesystem (yes, all office party photos and videos) and allows you to forget storage limitation notifications. Its other features include support for camera and microphonefor audio and video calls and desktop push notifications about new messages or events.

Andy supports multi-touch on touch-supported devices running Windows 8 and above. It also supports high-end graphics and Xbox/PS controllers, allowing you to play popular games your way yet without any (real) Android device. To take fun to the next level, Andy even lets you use your phone as a remote controlfor playing games on the big screen (of your computer) without sacrificing the multi-touch or gyro elements (of your phone).
Genymotion (Free | $136/year)
Genymotion is a premium offering for primarily Android developers, but it is also suitable for users and gamers with the intention to run Android apps or games on PCs or iMacs. The emulator supports webcam and microphone, like BlueStacks and Andy, for making audio or video calls using WhatsApp, Skype and other VoIP apps. Its paid version offers a reset button for if or when you brick the emulator.

Genymotion is known for its quick boot and high performance for running HD games. Offering latest Android releases quickly is one of the best feature of Genymotion apart from delivering fast performance and offering over 3K hardware configurations to run or test apps in multiple hardware scenarios.
[Download: Windows, Mac OS X, Linux]
Xamarin Android Player (Free)
Xamarin Android Player includes a native user interface for desktops and lets you run and test apps efficiently. With a primary focus for developers, Xamarin is actually easily usable by laypersons who want to try out Android’s new features, run apps or play high-end games. It avails features such as network and hardware simulation, native-like Android experience and lots more.

The emulator replicates a full-featured Android and is basically the same as Android Emulator with exception to performance – Xamarin Android Playerruns faster than the default emulator by Google. It offers beautifully designed interface like Genymotion’s and good support for most of Play Store’s apps and games.
Android Emulator (Free)
Android Emulator is the de facto emulator offering from Google. It mimics Android with a set of software and hardware configuration. The emulator lets you run and test apps by using AVDs (techno-fancy name for emulator device). With this emulator, you can enjoy multimedia, use multiple services, customize the emulator dashboard, access the network, run apps and play games on your PC, Mac or Linux.

Coming directly from the Android team, this emulator offers new Android releases faster than any other emulator in the market and even avails pre-release versions for enthusiasts eager to have hands-on experience with the newest trial features. Though this emulator is not as user-friendly as others, it works well for running mobile apps on desktops, and it’s also available for Linux.
[Download: Windows, Mac OS X, Linux]
Which emulator are you going to download? Did we miss your favourite Android Emulator? Kindly let us know via the comments section below.
------------------------------------------------------------------------------------------------------------------------------------------------------------------------------------------------------------------------
COMPUTER TIPS
COMPUTER SHORTCUTS FOR WINDOWS-EXCEL
કમ્યુટર ગુજરાતીમાં ઓનલાઈન મફત શીખો
MICROSOFT WORD 2007 TUTORIALS – 1 TO 13
MICROSOFT WORD 2010 STEP BY STEP VIDEO
LEARN MICROSOFT WORD(TUTORIALS)
LEARN M S OFFICE WORD/EXCEL/POWERPOINT/ACCESS FREE
How To Use Word-Tutorial Microsoft Office
Using Microsoft Word 2010: A complete tutorial
MICROSOFT WORD 2007 TUTORIALS
WORD 2010 VIDEOS
Getting Started with Office 2010
MICROSOFT EXCEL TUTORIALS FOR BEGINNERS
EASY EXCEL FORMULA-VERY GOOD FOR STUDENTS
HOW TO PROTECT YOUR EMAIL ADDRSS BOOK
COMPUTER TIPS-1
WORD TIPS
M.S.OFFICE TIPS
M.S.EXCELL TIPS
૩૧ – એક્સેલની ટીપ્સ – Excel Tips
M.S.POWERPOINT TIPS
WINDOWS TIPS
ACCESS TIPS
COMPUTER SHORT CUTS-SPECIAL CHARACTERS
USEFUL KEYBOARD SHORTCUTS
HTML INSTANT
ADVANCE EXCEL FORMULAS AND FUNCTIONS
MORE THAN 100 KEYBOARD SHORTCUTS
4 MINUTES OFFICE EXERCISES
HOW TO WRITE HTML AND CSS CODES
Microsoft Word 2010: Headers, Footers, and Page Numbers
HOW TO SIT AGAINST COMPUTER
Useful Photo Editing Software for Free Download
HOW INTERNET WORKS
FREE PHOTO EDITING SOFTWARE – FOTOR
CDBurnerXP – The Best Free CD/DVD Tool
GET FREE COUPONS AT CHECKOUT AUTOMATICALLY IN US
PRINT FRIENDLY ANY URL/DOCUMENT
CONVERT ANYTHING TO ANY OTHER FORMAT
IMAGE SPILTER
HOW TO USE MICROSOFT PAINT AND TIPS
HOW TO PROTECT YOUR FACEBOOK ACCOUNT FROM HACKERS
APP FOR TYPING IN INDIAN LANGUAGES ON ANDROID CELLPHONES
INDIAN BOY WHO INVENTED EMAIL
HOW TO MAKE SYMBOLS WITH KEYBOARD
TABLE TOP TECHNOLOGY-MICROSOFT SURFACE-2
REPETITIVE STRAIN INJURIES-RSI PRESENTATION
MATHWAY TO SOLVE MATHS PROBLEMS
ONLINE DICTIONARY
FREE-INSTALL AND UPDATE ALL PROGRAMM
POWER POINT SHORT CUTS 1.13
COMMON ERROR CODES
MORE THAN 100 KEYBOARD SHORTCUTS
ઇન્ટરનેટ સર્ફીંગ ની સ્પીડ વધારો.
હવે દરેક ના ઘરમાં ઈન્ટરનેટ સાથેનું જ કમ્પ્યુટર જોવા મળતું હોય છે, જોકે ઈન્ટરનેટ કનેક્શન દ્વારા ઈન્ટરનેટ સર્ફીગ નો લહાવો મળતો હોય છેપરંતુ લીધેલા કનેક્શન માં સ્પીડ ઓછી હોવાને કારણે મજા બગડી જતીહોય છે.જો તમારે કમ્પ્યુટરમાં પણ ઇન્ટરનેટ હોય અને તમારે તેની સ્પીડમાં વધારો કરવો હોય તો આ માટેની એક ઉપાય છે તો આ માટે નીચેનીપ્રોસેસ કરો .૧. Start > Run જઈ gpedit.msc ટાઇપ કરો અને એન્ટર પ્રેસ કરો.૨. આમ કર્યા બાદ Group Policyની વિન્ડો ઓપેન થશે .૩. આ વિન્ડોમાં સાબી પેનલમાંથી Computer Configuration > Administrative template > Network > QoS Packet Scheduleપરક્લિક કરો
૪. આમ કરવાથી તમારી જમણી બાજુ એક લીસ્ટ ઓપન થશે તેમાંથીLimit Reversableપર ડબલ ક્લિક કરો
૫. જેથી એક બોક્સ ઓપન થશે તેમાં Enable નામનું રેડીયો બોક્સ ટીકકરો.૬. ત્યાર બાદ નીચે Bandwidth limit (%) નું બોક્સ ઓપન થશે જેનેઘટાડીને ૦% કરી દો ( જો શૂન્ય જ હશે તો કોઈ ફરક નહિ પડે)૭. આ પછી Apply પ્રેસ કરો અને OK કરી દો
૮. બસ, આટલું કર્યા પછી તમારી ઇન્ટરનેટ ની સ્પીડમાં વધારો જણાશે.બને તો એકવાર કમ્પ્યુટર Restart કરીને પણ ચેક કરી જુઓ.જો તમને આ લેખ ગમ્યો હોય તો શેર કરો તમારા મિત્રો સાથે અને કોમેન્ટઆપો. અભાર…..
મોબાઈલનો કેમેરો, વેબકેમ બની ગયો
ઈન્ટરનેટનો વ્યાપ ખૂબ જ ઝડપથી વધી રહ્યો છે. ઇન્ટરનેટનો શબ્દસાંભળતાં પહેલા જ બે શબ્દો યાદ આવે chatting અને e-mail. એમાંપણ video અને voice chat ની મજા જ કંઇક અલગ છે. દેશ-વિદેશમાંરહેતા સગા-સંબધીઓ જોડે પહેલા ફોન પર વાત થતી હતી. ત્યારબાદtext chatting દ્વારા વાતો કરવાની નાણાંકીય રીતે સસ્તી પાડવા લાગી.હવે તો video અને voice chat દ્વારા કોઈ દૂર લાગતું જ નથી. Video chat કરવા માટે Webcam ની જરૂરીયાત રહે છે. હાલમાં પણ એવા ઘણાઈન્ટરનેટ ઉપયોગકર્તા છે કે જેમની પાસે webcam નથી. પરંતુ આપણેએમ કહી શકીએ કે તે બધા પાસે કેમેરાવાળો મોબાઈલ ફોન જરૂરથી હશે.તો મિત્રો આજથી જ મોબાઈલ ફોનનો તમે webcam તરીકે ઉપયોગ કરીશકો છો. આ માટે Mobiola નામનું webcam સોફ્ટવેરને સૌપ્રથમમોબાઈલમાં Install કરવામાં આવે છે. જ્યાં એનું Simple configuration કરવામાં આવે છે. ત્યારબાદ Mobiola નું Desktop version કમ્પ્યુટરમાં install કરવામાં આવે છે. ત્યારબાદ મોબાઈલનાMobiola સોફ્ટવેરને શરૂ કરતાં જ તે કમ્પ્યુટર સાથે Wi-Fi કે USB દ્વારાconnect કરવું છે તે અંગેનું selection કરતાં જ Webcam શરૂ થઇ જશે.આટલું જ નહિ, આ સોફ્ટવેર દ્વારા ફોટો પણ પાડી શકાય છે. તેમજ નાના-મોટા image editing ની સગવડ પણ આ સોફ્ટવેર પૂરી પાડે છે. આસોફ્ટવેરનું Demo Version
www.mobiola.com
પરથી ડાઉનલોડ કરી શકાય છે.
AAAAAAAAAAAAAAAAAAAAAAAAAAAAAAA
આ એક એવો પ્રોજેક્ટ છે જેમાં
દરરોજ એક કંપની પોતાનું એક
સોફ્ટવેર ફ્રી આપે છે લાયસન્સ
કી સાથે આપે જે તેજ દિવસે
ડાઉનલોડ કરી એક્ટીવેટ કરી
દેવું પડે છે. પછી નિયમિત
વાપરી શકો છો.
www.giveawayoftheday.com
Troubleshooting
Sometimes, browser settings can interfere with the
installation of the necessary validation components. View
troubleshooting tips and tricks for common installation issues:
-
Open Firefox
-
On the Tools menu, select Options.
-
On the Content tab, ensure that Enable Javascript is selected.
-
Click OK to close the Options dialog box and save the changes just made.
-
Open Firefox
-
Click on the Tools menu and select Options
-
On the Privacy tab, ensure that Accept cookies from sites
is selected. (Note: if you do not see this option, then consult
Mozilla Firefox Help for instructions on how to enable this view)
-
Click OK
In some cases, it may be necessary to restart your PC after installing this software. To do this:
-
Print this Web page before restarting.
-
Restart your PC.
-
Open Firefox.
-
Type http://www.microsoft.com/genuine
-
Windows will continue the validation process.
If you have already installed this software but are still
seeing this message, the original installation may have failed, or
licensing components that Windows 7 needs to work properly may have been
moved, changed, or deleted. To repair the update:
-
Click Start.
-
Click Control Panel.
-
Under Programs, click Uninstall a program.
-
Select “Update for Windows (KB971033)” and click Uninstall.
-
Return to this web page and click Download to reinstall.

-
Open Firefox
-
On the Tools menu, select Options.
-
On the Content tab, ensure that Enable Javascript is selected.
-
Click OK to close the Options dialog box and save the changes just made.
-
Open Firefox
-
Click on the Tools menu and select Options
-
On the Privacy tab, ensure that Accept cookies from sites
is selected. (Note: if you do not see this option, then consult
Mozilla Firefox Help for instructions on how to enable this view)
-
Click OK
In some cases, it may be necessary to restart your PC after installing this software. To do this:
-
Print this Web page before restarting.
-
Restart your PC.
-
Open Firefox.
-
Type http://www.microsoft.com/genuine
-
Windows will continue the validation process.
If you have already installed this software but are still
seeing this message, the original installation may have failed, or
licensing components that Windows 7 needs to work properly may have been
moved, changed, or deleted. To repair the update:
-
Click Start.
-
Click Control Panel.
-
Under Programs, click Uninstall a program.
-
Select “Update for Windows (KB971033)” and click Uninstall.
-
Return to this web page and click Download to reinstall.
How to Speed up your windows PC
1. Go to Start -> Accessories -> Run and type recent then press enter. Now delete all the files in this page. Repeat the same process by typing prefetch and %temp% which removes temporary files from the computer.

2. Go to start–>Run , type cleanmgr and press enter. Select any drive and press ok, then check all
the options in next window and press ok again and press on delete files in next window. This is known as disk clean up.
the options in next window and press ok again and press on delete files in next window. This is known as disk clean up.


Disk Cleanup deletes Temporary Internet Files , old downloaded program files, empty the Recycle bin, and delete Temporary Files. It also allow users to delete Offline Webpages, Microsoft Error Reporting Temporary Files, Web Client/Publisher Temporary Files, Compress old files and Catalog files for the Content Indexer.
3. Right click on Computer in windows 7 and Go to Properties ->Performance Information and Tools->Advanced Tools -> click on open disk Defragmenter and defragment your files in local disks. It arrange the files in an order.

You may also find the disk Defragmenter by Right clicking on the drives in computer i.e. local Disk (C:) , local Disk (D:) etc. and then go to Properties–>Tools–> Defragment Now.

4. Right click on the drives in computer i.e. local Disk (C:) , local Disk (D:) etc. and then Go to
Properties–>Tools–> Check Now and then delete the Bad sectors and fix errors of your drives.
Properties–>Tools–> Check Now and then delete the Bad sectors and fix errors of your drives.

5. Go to start–>Run , type msconfig. Then click on startup tab in next window and uncheck the
undesired programs and press apply. Then click on boot tab and set the timeout to 10 seconds.
undesired programs and press apply. Then click on boot tab and set the timeout to 10 seconds.


6. Leave atleast 10GB of memory free in your ‘C’ drive.
7. Uninstall Unused Program because when program is installed, it creates connections between the program and the operating system. Even if you don’t use these programs, they can slow down your system. If you have the original program’s installation disk or file, removing programs will free up space on your computer and may speed up your system’s performance.
_______________________________________________________________________________


_______________________________________________________________________________
– હિમાંશુ કીકાણી

આ વર્ષના નહીં, પણ ગયા વર્ષના પુસ્તકમેળામાં એક પિતા-પુત્ર વચ્ચે આજીવન યાદ રહે એવો સંવાદ સાંભળ્યો હતો. આ કોલમના લેખોનો સંગ્રહ, ‘સાયબરસફર’ મેગેઝિન વગેરે જોઈને પિતાએ હોંશથી દીકરાને કહ્યું, ‘‘લેવું છે? આપણને બંનેને કામ લાગશે!’’ દીકરાએ ઊડતી નજર નાખીને કહ્યું, ‘‘મને તો બધું આવડે છે.’’ પિતાએ કહ્યું, ‘‘દીકરા, આ ઉંમરે હું પણ એમ કહી શકતો નથી, તું અત્યારથી એમ માની લઈશ તો કેમ ચાલશે?’’
નવી પેઢી વધુ સ્માર્ટ અને વધુ જાણકાર ચોક્કસ છે, પણ ‘બધું આવડે છે’ની માનસિકતા તો પૂર્ણવિરામ છે! આપણે ઘણી બધી બાબતોમાં ‘બધું આવડે છે’ના ભ્રમમાં હોઈએ છીએ અને એમાંની એક બાબત એટલે ટાઇપિંગ!
જેમને કમ્પ્યુટર પર થોડું ઘણું પણ કામ કરવાનું રહે છે એવા મોટા ભાગના લોકો, કમ્પ્યુટર પરની સફરના પહેલા કદમ જેવા ટાઇપિંગ તરફ લગભગ ધ્યાન આપતા નથી. પરિણામે લાંબા સમય સુધી કાં તો બંને હાથની એક-એક આંગળીથી ટાઇપ કરતા રહે છે, અથવા બધો સમય કી-બોર્ડ પર નજર ખોડી રાખીને, જુદી જુદી કી શોધીને તેમણે કામ કરવું પડે છે, આમાં યંગસ્ટર્સ પણ બાકાત નથી.
આમાંથી બહાર નીકળવું હોય, તમારા વિચારોની ઝડપે ટાઇપ કરવું હોય તો તમારે ટચ ટાઇપિંગ શીખવું પડે. ટચ ટાઇપિંગ એટલે કી-બોર્ડ પર નજર રાખવાની બિલકુલ જરૂર વિના, ફક્ત સ્પર્શના અનુભવથી ટાઇપિંગ કરવાની કળા. આ કળા જો આત્મસાત થઈ જાય તો તમે કાગળ-પેન કરતાં પણ વધુ ઝડપથી કમ્પ્યુટર પર ટાઇપ કરી શકો અને ટાઇપિંગ પછીનું કામ પણ ઝડપી બની શકે.
વાત કી-બોર્ડ પર નજર રાખ્યા વિના ટાઇપિંગ કરતાં શીખવાની છે, પણ એ માટે પહેલાં કી-બોર્ડ પર જરા વધુ ધ્યાનથી નજર નાખવી પડશે! કી-બોર્ડમાં આમ સાવ આડાઅવળા અક્ષરોની ગોઠવણી કેમ કરી હશે એવું સાદું કૂતુલણ પણ આપણને લગભગ ક્યારેય થતું નથી (જે સવાલ પહેલી વાર કી-બોર્ડ જોતા બાળકને અચૂક થતો હશે!), આપણે તો યંત્રવત, ફાવે તેમ ટાઇપિંગ કરી લઈએ છીએ. હકીકતમાં અત્યારનું ‘ક્વર્ટી- qwerty’ તરીકે ઓળખાતું કી-બોર્ડ (અક્ષરોની પહેલી હરોળના અક્ષરો પરથી આ નામ પડ્યું.) 19મી સદીમાં ટાઇપરાઇટર સાથે વિકસ્યું (તેની શોધ વિશે વિવાદ છે, કેટલાક માને છે કે ટાઇપરાઇટર જામ ન થઈ જાય એટલે આવી ગોઠવણી થઈ, તો નવાં સંશોધનો કહે છે કે ટેલિગ્રાફ ઓપરેટર્સની સલાહ મુજબ આવી ગોઠવણી થઈ હતી). કી-બોર્ડમાં જુદા જુદા ફેરફાર પણ થયા છે, છતાં અત્યારે સૌથી વધુ ચલણ આ કર્વર્ટી કી-બોર્ડનું જ છે. તેને વૈજ્ઞાનિક ગણીએ કે ન ગણીએ, પરંતુ વૈજ્ઞાનિક ઢબે તેનો ઉપયોગ શીખવાનો પ્રયાસ કરીએ તો પિયાનો કે હાર્મોનિયમ વગાડતા સિદ્ધહસ્તની જેમ આપણે પણ કી-બોર્ડના કલાકાર ચોક્કસ બની શકીએ!
એ માટે મદદરૂપ થાય એવી એક ફ્રી વેબ અપ્લિકેશન છે – http://www.keybr.com/
તમે વર્ષો પહેલાં ટાઇપરાઇટર માટેનું ટાઇપિંગ શીખ્યા હશો તો યાદ હશે કે તેમાં ક્લાસવાળા બે-બે કે ત્રણ-ત્રણ અક્ષરના શબ્દ આંગળીઓ કરતાં મગજ વધુ થાકી જાય એટલી વાર ટાઇપ કરાવતા હતા. જ્યારે આ વેબસાઇટ પર, આપણી આવડત અનુસાર સ્માર્ટ અલ્ગોરિધમથી નાનાં નાનાં ટાઇપિંગ લેસન્સ જનરેટ થતાં જાય છે અને આપણે તેની પ્રેક્ટિસ કરવાની રહે છે. એક લેસન પતે એટલે આપણો સ્કોર જાણવા મળે, આપણે મિનિટદીઠ કેટલા શબ્દની ઝડપે ડાઇપ કરી શક્યા, કેટલી ભૂલ કરી, આપણા વિશ્વાસનું સ્તર કેવુંક રહ્યું વગેરે જાણવા મળે.
સાઇટનો દાવો છે અને ઘણે અંશે સાચો પણ છે કે જેનો કંઈ અર્થ નીકળતો ન હોય એવું વારંવાર ટાઇપ કરવાને બદલે, અર્થસભર વાક્યો ટાઇપ કરવાનાં હોય તો આપણને સહેલું લાગે, મજા પડે અને તેમાં વારંવાર જે કી પ્રેસ કરવાની થતી હોય તે યાદ પણ રહેવા લાગે (સાઇટ આપોઆપ જે રેન્ડમ લેસન્સ જનરેટ કરે છે તેમાં આ મુદ્દાનો ખાસ ખ્યાલ રાખવામાં આવે છે). આ સાઇટની સિસ્ટમ આપણે જેમ જેમ ટાઇપ કરતા જઈએ તેમ તેમ આપણને દરેક કી પ્રેસ કરવામાં (એટલે કે શોધવામાં!) કેટલો સમય લાગે છે તેની પણ નોંધ રાખવામાં આવે છે અને તેના આધારે આગળનાં લેસન્સ જનરેટ થાય છે.
આ સાઇટ પર જઈને આપણે સીધું જ કી-બોર્ડ પર ત્રાટકી શકીએ છીએ, પણ તમે તમારી પ્રગતિનો બરાબર ટ્રેક રાખીને આગળ વધવા માગતા હો તો સાઇટ પર ફ્રી એકાઉન્ટ ખોલાવીને વધારાની સગવડના લાભ લઈ શકો છો. સાઇટ પર મલ્ટિપ્લેયર ટાઇપિંગ રેસ કરવાની પણ સગવડ છે!
આપણે મોબાઇલમાં lol કે you are ને બદલે ur જેવું ઝડપથી લખીને ભલે કામ ચલાવી લેતા હોઈએ, પણ વાસ્તવિક જીવનમાં, વ્યાવસાયિક કારકિર્દીમાં એવા શોર્ટકટ ચાલશે નહીં અને એ રેસમાં આગળ રહેવા તેજ ગતિએ વિચારવાની અને એટલી જ તેજ ગતિએ તેને કમ્પોઝ કરવાની શક્તિ કેળવવી જરૂરી છે.
શ્રી હિમાંશુ કીકાણી
____________________________________________________________________________________________
– હિમાંશુ કીકાણી

‘સૌથી મોટી ખાણ, ઓળખાણ’ આપણા વડીલો ઓળખાણના મહત્ત્વ વિશે આ વાત કહી ગયા છે, પણ ત્યારે જમાનો પોસ્ટકાર્ડનો હતો, આજની જેમ સોશિયલ મીડિયા અને ઇન્સ્ટન્ટ મેસેજિંગનો નહોતો! આજે તો ઓળખાણ ખરેખરી ખાણ જેવી બની ગઈ છે, ઉલેચી ઉલેચીને થાકો.
વિવિધ કોન્ટેક્ટસ સાચવવાની આપણી સફર યાદશક્તિથી શરૂ થઈને વાયા સાદી ડાયરી અને સાદા ફોનમાં થઈને, પીસીમાંના ઈ-મેઇલ પ્રોગ્રામ અને હવે સ્માર્ટફોન કે ટેબલેટ સુધી પહોંચી છે. આ લાંબી સફરમાં તકલીફ એ થઈ છે કે મોટા ભાગના લોકોને પોતાના સ્માર્ટફોનમાં એક જ વ્યક્તિ માટે ચાર-પાંચ કોન્ટેક્ટ ડીટેઇલ જોવા મળે છે!
સદભાગ્યે, બહુ લાંબો સમય રાહ જોવડાવ્યા પછી આખરે ગૂગલે હમણાં હમણાં તેની કોન્ટેક્ટ્સ સર્વિસમાં મોટા ફેરફાર કર્યા છે. ગૂગલની બીજી તમામ સર્વિસમાં વારંવાર અપડેટ્સ આવ્યા છે, પણ એ બધાના પાયામાં જે છે તે કોન્ટેક્ટ્સ તરફ કંપની સૌથી ઓછું ધ્યાન આપતી હતી. હવે તેમાં મેજર અપડેટ આવેલ છે, સૌથી મોટા ફેરફાર ડિઝાઇનના છે (એ પણ બહુ અગત્યના છે) અને તે ઉપરાંત કેટલીક સુવિધા પણ ઉમેરાઈ છે.
આ અપડેટની વાત કરતાં પહેલાં, ગૂગલ કોન્ટેક્ટ્સ આપણે માટે કેમ મહત્ત્વના છે એ સમજી લઈએ. આજના સમયમાં, મોટા ભાગના લોકો એન્ડ્રોઇડ સ્માર્ટફોન વાપરતા હોવાથી તેમના માટે કોન્ટેક્ટસ પોતાના ગૂગલ એકાઉન્ટમાં સાચવવા અનિવાર્ય છે. તમે જીમેઇલ વાપરતા હો તો તેમાં જીમેઇલના લોગોની તરત નીચે આપેલા ડ્રોપડાઉન મેનુની મદદથી ગૂગલ કોન્ટેક્ટ્સમાં જઈ શકાય છે. સામાન્ય રીતે આપણે અહીં જવાની જરૂર જ પડતી નથી કેમ કે આપણે જેનો ઉપયોગ કરતા હોઈએ એ બધાં ઈ-મેઇલ એડ્રેસ આપોઆપ અહીં જમા થતાં રહે છે. બીજી તરફ, આપણે સ્માર્ટફોનમાં ગૂગલ કોન્ટેક્ટ્સ સિન્ક કર્યા હોય તો તેની કોન્ટેક્ટ્સ એપ (કે પીપલ એપ)માં પણ આ એડ્રેસીઝ દેખાય છે. થાય એવું કે જો આપણે કોઈ વ્યક્તિ સાથે ઇ-મેઇલ પર સંપર્કમાં રહ્યા હોઈએ તો તેમના ઇ-મેઇલ આઇડી સાથેનો એક કોન્ટેક્ટ આપણા એકાઉન્ટમાં સેવ થાય. હવે જો એ વ્યક્તિનો ફોન નંબર, સ્માર્ટફોનમાં નવા કોન્ટેક્ટ તરીકે સેવ કરીએ તો એ જ નામનો બીજો કોન્ટેક્ટ સેવ થાય! (ડુપ્લિકેટ નંબર દેખાવાનાં બીજાં પણ ઘણાં કારણો છે. જેમ કે તમે સિમ કાર્ડમાં પણ નંબર સેવ કર્યા હોય અને ગૂગલ એકાઉન્ટ પણ સિન્ક્ડ હોય તો પણ એક જ વ્યક્તિને નામે બે કોન્ટેક્ટ દેખાય).
ઉપરાંત, આજના સમયમાં આપણે વારંવાર ફોન બદલતા હોવાથી અને એકથી વધુ ડિવાઇસ વાપરતા હોવાથી, તમામ કોન્ટેક્ટ ફક્ત ગૂગલ એકાઉન્ટમાં સેવ કરીને જુદા જુદા ડિવાઇસમાં સિન્ક કરવામાં ફાયદો છે, જેથી એક જગ્યાએ કંઈ પણ ફેરફાર કરતાં, તમામ જગ્યાએ તે લાગુ પડે.
ગૂગલ કોન્ટેક્ટ્સમાં આવેલા મેજર અપડેટની વાત કરીએ તો તેમાં બિલકુલ નવી ડિઝાઇનને બાદ કરીએ તો જે સુવિધા ઉમેરાઈ હોવાનું કહેવામાં આવે છે તે સાવ નવી નથી. જો તમે કોન્ટેક્ટ્સનો ભરપૂર ઉપયોગ કરતા હશો તો તમે આ ફેરફારો નોંધ્યા જ હશે, અલબત્ત નવી ડિઝાઇનને કારણે આ સુવિધાનો ઉપયોગ હવે ઘણો વધુ આસાન બન્યો છે.
ગૂગલ કોન્ટેક્ટ્સમાં ડુપ્લિકેટ્સ મર્જ કરવાની સુવિધા તો હતી જ, પણ હવે ફાઇન્ડ ડુપ્લિકેટ્સમાં જતાં, ડુપ્લિકેટસ કોન્ટેક્ટની બધી ડિટેઇલ્સ નજર સામે રહે છે અને આપણે બંને (કે તેથી વધુ) કોન્ટેક્ટની વિગતો સરખાવીને એક ક્લિકથી તેમને મર્જ કરી શકીએ છીએ. આપણા તમામ કોન્ટેક્ટ્સને યોગ્ય રીતે સાચવવા માટે આ સુવિધા, નવી ડિઝાઇનને કારણે સૌથી વધુ લાભદાયી નીવડી શકે છે.
બીજી નવી સુવિધા, જે તે વ્યક્તિના ગૂગલ પ્રોફાઇલમાંની વિગતો અને આપણે સેવ કરેલી વિગતોને આપોઆપ જોડવાની છે. પરિણામે, જો તમારી કોઈ પરિચિત વ્યક્તિનો જૂનો નંબર તમારી પાસે હોય, અને એ વ્યક્તિએ પોતાનો નવો ફોનનંબર પોતાના ગૂગલ પ્રોફાઇલમાં પબ્લિકલી શેર કર્યો હોય, તો એ નવો નંબર આપોઆપ આપણા કોન્ટેક્ટમાં જોવા મળે છે (જોકે એ માટે એ વ્યક્તિનું જીમેઇલ એડ્રેસ આપણી પાસે હોવું જરૂરી છે. આ ગૂગલ પ્રોફાઇલની ક્યારેક વિગતવાર વાત કરવા જેવી છે, કેમ?).
ત્રીજી નવી સુવિધા, જે તે વ્યક્તિ સાથે આપણે જે કોઈ ઈ-મેઇલ કે કેલેન્ડર દ્વારા મીટિંગની વિગતો શેર કરી હોય તે બધી, એ વ્યક્તિના કોન્ટેક્ટ કાર્ડમાં જ હવે જોવા મળે છે!
અત્યારે આ સુવિધા ફક્ત જીમેઇલ એકાઉન્ટ ધારકોને મળશે (ગૂગલ એપ્સ માટે કામ ચાલી રહ્યું છે!). તમારા જીમેઇલ એકાઉન્ટમાં પણ આ અપડેટ્સ ન દેખાય એવું બની શકે છે, ત્યાં સુધી જીમેઇલમાં લોગ-ઇન થઈ, https://contacts.google.com/previewપર જઈને તમે આ નવી સુવિધાઓ તપાસી શકો છો.
તમારી એડ્રેસબુકમાંની ગરબડ-સરબડથી કંટાળ્યા હો તો એકાદ રવિવારે, આ નવાં ફીચર્સની મદદથી તેને ઠીકઠાક કરી લેશો તો લાઇફ ઘણી ઈઝી થઈ જશે!
શ્રી હિમાંશુ કીકાણી
--------------------------------------------------------------------------------------------------------------------------------------------------------------------------------------------------------------------------------------------------------------------


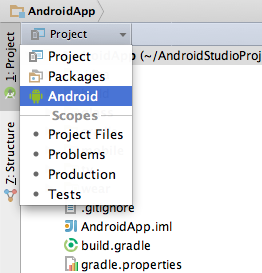


Figure 3. View Android Studio Project structure.
 in the toolbar to open it and create new virtual devices for running your app in the emulator.


--------------------------------------------------------------------------------------------------------------------------------------------------------------------------------------------------------------------------------------------------------------------
This guide shows you how to integrate the Google Mobile Ads SDK into a brand new app and use it to display an AdMob banner ad. It should take you about thirty minutes to complete and will give you a good sense of how the SDK functions within an app. If you're new to Google Mobile Ads, this is a great place to start before moving on to more advanced examples.
The ad unit and samples that we provide return test ads. Test ads are always available, even if your account is suspended or disabled. For more information, review the AdMob policies and learn more about invalid activity.
It is against AdMob policy to click on your own live ads. During development and testing, use test ads. If you do need to render live ads before launch, avoid clicking on them. If you click on live ads, your AdMob account may be suspended.
No two developers have the same level of experience, so we've added occasional notes like this one for those who are new to Android and Android Studio. If you're an expert, feel free to skip them.
Prerequisites
- Running Android Studio 1.0 or higher
- Developing for Android level 9 or higher
In order to complete the Get Started guide, you need to have Android Studio installed on your development machine. If you don't already have it, see the Android Studio site for instructions on how to download everything you need to get up and running.
If you haven't used Android Studio before, consider running through the First App Tutorial for Android Studio before starting this one.
Create a new project
In this step, you create a brand new project in Android Studio to use for our example. If you don't already have Studio running, go ahead and open it now.
Start the new project wizard
If you see the above welcome screen, select New Project. Otherwise, select File > New Project from the menu. This brings up the new project wizard:
Name your project
Enter "BannerExample" as the app name, and whatever company domain you use for your apps. Android Studio automatically determines a good project location, but feel free to change it if you'd like.
Set the required SDK version
On the next screen, select Phone and Tablet for the form factor and a minimum platform SDK version of 9. That's the minimum version supported by the Google Mobile Ads SDK.
Add your main activity
We're keeping it simple for this example, so on this screen select Empty Activity.
Name your activity
On this screen you have the option of choosing names for the app's activity and its related resources. Use the default names for this example, and just click the Finish button.
Compile your new project
After clicking Finish, you have a working project with a single activity. Try compiling and running it (select Run 'app' from the Run menu). You should see a "Hello world!" message on an otherwise empty gray screen. Don't worry, you'll add some more content in the next steps.
If you're new to developing Android apps, take a look at the tutorials for USB Debugging and Using Virtual Devices. You need to do one of those two things in order to run your new app and see what it looks like.
Configure gradle
To use the Mobile Ads SDK in your project, you first need to reference it as a dependency in your app's
build.gradlefile. Open BannerExample/app/build.gradle and look for a dependencies section near the bottom.build.gradle (excerpt)
...
dependencies {
        compile fileTree(dir: 'libs', include: ['*.jar'])
        compile 'com.android.support:appcompat-v7:22.2.0'
        compile 'com.google.android.gms:play-services-ads:8.4.0'
    }
...
Add a line to it like the one in bold above. This instructs gradle to include code from the
play-services-ads artifact, which is found in the Google Repository.
You may see a warning message across the top of the Android Studio window indicating that gradle needs to perform a sync. If that's the case, click Sync Now to do so. Gradle will refresh your project's libraries to include the dependency you just added.
If this is the first time you've used the Google Repository, you may also see a message asking you to install it. If that happens, just agree to the install and Android Studio will take care of the download for you.
Once your
build.gradle file is modified and everything has synced, try rebuilding your project (Run 'app' in the Runmenu) to make sure it compiles correctly. You won't see any changes, but including Google Play services is the first step toward getting ads into your app.Give your app an Ad Unit ID
An Ad Unit ID is a unique identifier given to the places in your app where ads are displayed. If you have an app with two activities, for example, each displaying a banner, you need two ad units, each with its own ID. AdMob ad unit IDs have the form
ca-app-pub-XXXXXXXXXXXXXXXX/NNNNNNNNNN
In order for your new app to display an ad, it needs to include an Ad Unit ID. Open your app's string resource file, which is found at
BannerExample/app/src/main/res/values/strings.xml.strings.xml
<?xml version="1.0" encoding="utf-8"?>
<resources>
    <string name="app_name">My Application</string>
    <string name="hello_world">Hello world!</string>
    <string name="action_settings">Settings</string>
    <string name="banner_ad_unit_id">ca-app-pub-3940256099942544/6300978111</string>
</resources>
Add a new
<string> tag as shown. Note that the Ad Unit ID provided above is just for testing. It allows you to retrieve a sample banner ad and make sure your implementation is correct. You should always use test ads when developing and testing your app. It is against AdMob policy to click on your own live ads. During development and testing, use test ads. If you do need to render live ads before launch, avoid clicking on them. If you click on live ads, your AdMob account may be suspended. See the Targeting page for information on how to get test ads with your own Ad Unit IDs.
While it's not a requirement, storing your Ad Unit ID values in a resource file is a good practice. As your app grows and your ad publishing needs mature, you will occasionally find that you want to change the ID values. If you make sure they're always in a resource file, you'll never have to search through your code looking for them.
Place an AdView in your main activity layout
Layout files contain XML definitions for the visual design of things like activities, fragments, and list items. In this step, you'll be modifying the layout file for the main activity so that it includes an
AdView at the bottom. You can add things to an activity progammatically via Java code, but layout files offer better separation of presentation and behavior.
There are only two steps remaining before your app is ready to show an ad. First, you need to modify your main activity's layout to include an
AdView. Open BannerExample/app/src/main/res/layout/activity_main.xml in the editor.activity_main.xml
<RelativeLayout xmlns:android="http://schemas.android.com/apk/res/android"
    xmlns:tools="http://schemas.android.com/tools" android:layout_width="match_parent"
    xmlns:ads="http://schemas.android.com/apk/res-auto"
    android:layout_height="match_parent" android:paddingLeft="@dimen/activity_horizontal_margin"
    android:paddingRight="@dimen/activity_horizontal_margin"
    android:paddingTop="@dimen/activity_vertical_margin"
    android:paddingBottom="@dimen/activity_vertical_margin"
    tools:context=".MainActivity">

    <TextView android:text="@string/hello_world" android:layout_width="wrap_content"
        android:layout_height="wrap_content" />

    <com.google.android.gms.ads.AdView
        android:id="@+id/adView"
        android:layout_width="wrap_content"
        android:layout_height="wrap_content"
        android:layout_centerHorizontal="true"
        android:layout_alignParentBottom="true"
        ads:adSize="BANNER"
        ads:adUnitId="@string/banner_ad_unit_id">
    </com.google.android.gms.ads.AdView>
</RelativeLayout>
Add these to the XML:
- An additional namespace used for ads:
http://schemas.android.com/apk/res-auto - A new element for your
AdView
You'll be asked to provide
layout_width and layout_height. You can set both to wrap_content. In the AdView tag, set the adSize to BANNER and the adUnitId to @string/banner_ad_unit_id.
If you look at the last parameter in the
AdView tag, you can see that it's called adUnitId. This is the Ad Unit ID that theAdView uses when requesting ads. In this case, we've given it a reference to the string resource you added in the last step, so the AdView uses that value.Load the ad in the MainActivity class
The last change needed is for you to add to your app's main activity class some Java code that loads an ad into the
AdView.
Open your
MainActivity.java file. It's' in the BannerExample/app/src/main/java/ folder, though the exact subdirectory path varies based on the domain you used when creating your project above. Once it's open in the editor, look for the onCreate method in the MainActivity class:MainActivity.java (excerpt)
package ...
import ...
import ...
import com.google.android.gms.ads.AdRequest;
import com.google.android.gms.ads.AdView;
public class MainActivity extends ActionBarActivity {

    ...

    protected void onCreate(Bundle savedInstanceState) {
        super.onCreate(savedInstanceState);
        setContentView(R.layout.activity_main);

        AdView mAdView = (AdView) findViewById(R.id.adView);
        AdRequest adRequest = new AdRequest.Builder().build();
        mAdView.loadAd(adRequest);
    }

    ...
}
Make these two changes:
- Import the
AdRequestandAdViewclasses. - Add code to find your
AdViewin the layout, create anAdRequest, and then load an ad into theAdViewwith it.
Do not use the
AdRequest line shown above if you are testing. Refer to our Targeting page to learn more about using test devices and test device IDs.
Once that's completed, you're finished. You now have a fully functional
AdView in your app's main activity.Enjoy a freshly loaded ad
Your app is now ready to display an ad using the Google Mobile Ads SDK. Run it again, and you should see a test banner displayed at the bottom of the device screen:
Congratulations! You've successfully integrated banner ads into an app.
See the finished example on Github
Android Studio Overview
In this document
See also
Android Studio is the official IDE for Android application development, based on IntelliJ IDEA. On top of the capabilities you expect from IntelliJ, Android Studio offers:
- Flexible Gradle-based build system
- Build variants and multiple
apkfile generation - Code templates to help you build common app features
- Rich layout editor with support for drag and drop theme editing
linttools to catch performance, usability, version compatibility, and other problems- ProGuard and app-signing capabilities
- Built-in support for Google Cloud Platform, making it easy to integrate Google Cloud Messaging and App Engine
- And much more
If you're new to Android Studio or the IntelliJ IDEA interface, this page provides an introduction to some key Android Studio features.
For specific Android Studio how-to documentation, see the pages in the Workflow section, such as Managing Projects from Android Studio and Building and Running from Android Studio. For a summary of the latest changes to Android Studio, see the Android Studio Release Notes.
Project and File Structure
Android project view
By default, Android Studio displays your project files in the Android project view. This view shows a flattened version of your project's structure that provides quick access to the key source files of Android projects and helps you work with theGradle-based build system. The Android project view:
- Shows the most important source directories at the top level of the module hierarchy.
- Groups the build files for all modules in a common folder.
- Groups all the manifest files for each module in a common folder.
- Shows resource files from all Gradle source sets.
- Groups resource files for different locales, orientations, and screen types in a single group per resource type.
Figure 1. Show the Android project view.
Figure 2. Show project build files.
The Android project view shows all the build files at the top level of the project hierarchy under Gradle Scripts. Each project module appears as a folder at the top level of the project hierarchy and contains these four elements at the top level:
java/- Source files for the module.manifests/- Manifest files for the module.res/- Resource files for the module.Gradle Scripts/- Gradle build and property files.
For example, Android project view groups all the instances of the
ic_launcher.png resource for different screen densities under the same element.
Note: The project structure on disk differs from this flattened representation. To switch to back to the segregated project view, select Project from the Project drop-down.
Other Android Studio views
When you use the Project view in Android Studio, you should notice that the project structure appears different than you may be used to in Eclipse. Each instance of Android Studio contains a project with one or more application modules. Each application module folder contains the complete source sets for that module, including
src/main/ andsrc/androidTest/ directories, resources, build file and the Android manifest. For the most part, you will need to modify the files under each module's src/main/ directory for source code updates, the gradle.build file for build specification and the files under src/androidTest/ directory for test case creation.
You can also customize the view of the project files to focus on specific aspects of your app development:
- Packages
- Project Files
- Scratches
- Problems
- Production
- Tests
For example, selecting the Problems view of your project displays links to the source files containing any recognized coding and syntax errors, such as missing an XML element closing tag in a layout file.
For more information, see IntelliJ project organization and Managing Projects.
Android Build System
The Android build system is the toolkit you use to build, test, run and package your apps. This build system replaces the Ant system used with Eclipse ADT. It can run as an integrated tool from the Android Studio menu and independently from the command line. You can use the features of the build system to:
- Customize, configure, and extend the build process.
- Create multiple APKs for your app with different features using the same project and modules.
- Reuse code and resources across source sets.
The flexibility of the Android build system enables you to achieve all of this without modifying your app's core source files. To build an Android Studio project, see Building and Running from Android Studio. To configure custom build settings in an Android Studio project, see Configuring Gradle Builds.
Debug and Performance
Android Studio provides a number of improvements to assist you in debugging and improving the performance of your code, including an improved virtual device management, inline debugging, and performance analysis tools.
Android Virtual Device (AVD) Manager
AVD Manager has updated screens with links to help you select the most popular device configurations, screen sizes and resolutions for your app previews.
Click the Android Virtual Device Manager in the toolbar to open it and create new virtual devices for running your app in the emulator.
The AVD Manager comes with emulators for Nexus 6 and Nexus 9 devices and also supports creating custom Android device skins based on specific emulator properties and assigning those skins to hardware profiles. Android Studio installs the Intel® x86 Hardware Accelerated Execution Manager (HAXM) emulator accelerator and creates a default emulator for quick app prototyping.
For more information, see Managing AVDs.
Inline debugging
Use inline debugging to enhance your code walk-throughs in the debugger view with inline verification of references, expressions, and variable values. Inline debug information includes:
- Inline variable values
- Referring objects that reference a selected object
- Method return values
- Lambda and operator expressions
- Tool tip values
To enable inline debugging, in the Debug window click the Settings icon  and select the check box for Show Values In Editor.
Memory and CPU monitor
Android Studio provides a memory and CPU monitor view so you can more easily monitor your app's performance and memory usage to track CPU usage, find deallocated objects, locate memory leaks, and track the amount of memory the connected device is using. With your app running on a device or emulator, click the Android tab in the lower left corner of the runtime window to launch the Android runtime window. Click the Memory or CPU tab.
Figure 4. Monitor memory and CPU usage.
Heap dump
When you're monitoring memory usage in Android Studio you can, at the same time, initiate garbage collection and dump the Java heap to a heap snapshot in an Android-specific HPROF binary format file. The HPROF viewer displays classes, instances of each class, and a reference tree to help you track memory usage and find memory leaks.
Figure 5. HPROF viewer with heap dump.
To create a snapshot of the Android app heap memory, click the Dump Java Heap icon ( ) in the Memory Monitor. Android Studio creates the heap snapshot file with the filename
Snapshot-yyyy.mm.dd-hh.mm.ss.hprof in the Capturestab. Double-click the heap snapshot file to open the HPROF viewer.
To convert a heap dump to standard HPROF format in Android Studio, right-click a heap snapshot in the Captures view and select Export to standard .hprof.
Allocation tracker
Android Studio allows you to track memory allocation as it monitors memory use. Tracking memory allocation allows you to monitor where objects are being allocated when you perform certain actions. Knowing these allocations enables you to adjust the method calls related to those actions to optimize your app's performance and memory use.
Figure 6. Allocation tracker.
For information about tracking and analyzing allocations, see Memory Monitor.
Data file access
The Android SDK tools, such as Systrace, logcat, and Traceview, generate performance and debugging data for detailed app analysis.
To view the available generated data files, click Captures in the left corner of the runtime window. In the list of the generated files, double-click a file to view the data. Right-click any
.hprof files to convert them to a standard .hprof file format.Code inspections
In Android Studio, the configured
lint and other IDE inspections run automatically whenever you compile your program. In addition to the configured lint checks, additional IntelliJ code inspections and annotation validation run to streamline code review.
Android Studio enables several
lint checks to ensure:Cipher.getInstance()is used with safe values- In custom Views, the associated declare-styleable for the custom view uses the same base name as the class name
- Security check for fragment injection
- Where ever property assignment no longer works as expected
- Gradle plugin version is compatible with the SDK
- Right to left validation
- Required API version
- many others
Hovering over an inspection error displays the full issue explanation inline for easy error resolution. There is also a helpful hyperlink at the end of the error message for additional error information.
With Android Studio, you can also run
lint inspections for a specific build variant, or for all build variants. You can configure the lint inspections that run by adding a lintOptions property to the Android settings in the build.gradlefile.android { lintOptions { // set to true to turn off analysis progress reporting by lint quiet true // if true, stop the gradle build if errors are found abortOnError false // if true, only report errors ignoreWarnings true }
You can also manage inspection profiles and configure inspections within Android Studio. Choose File > Settings >, expand the Editor options, and select Inspections. The Inspection Configuration page appears with the supported inspections.
Figure 5. Configure inspections.
Note: To change the behavior of specific inspection notifications, change the inspection severity, for example fromwarning to error.
To manually run inspections in Android Studio, choose Analyze > Inspect Code. The Inspections Scope dialog appears so you can specify the desired inspection profile and scope.
Running inspections from the command line
You can also run
lint inspections from the command line in your SDK directory.sdk$ lint [flags]
Note: The
lint --show and --list flags can be used to display the available issues and explanations.
For more information, see Improving Your Code with
lint and lint tool.Annotations in Android Studio
Android Studio supports annotations for variables, parameters, and return values to help you catch bugs, such as null pointer exceptions and resource type conflicts. The Android SDK Manager packages the
Support-Annotations library in the Android Support Repository for use with Android Studio. Android Studio validates the configured annotations during code inspection.
To add annotations to your code in Android Studio, first add a dependency for the
Support-Annotations library:- Select File > Project Structure.
- In the Project Structure dialog, select the desired module, click the Dependencies tab.
- Click the
 icon to include a Library dependency.
 - In the Choose Library Dependency dialog, select
support-annotationsand click Ok.
The
build.gradle file is updated with the support-annotations dependency.
You can also manually add this dependency to your
build.gradle file, as shown in the following example.dependencies { compile fileTree(dir: 'libs', include: ['*.jar']) compile 'com.android.support:appcompat-v7:22.0.0' compile 'com.android.support:support-annotations:22.0.0' }
Inferring nullability
A nullability analysis scans the contracts throughout the method hierarchies in your code to detect:
- Calling methods that can return null
- Methods that should not return null
- Variables, such as fields, local variables, and parameters, that can be null
- Variables, such as fields, local variables, and parameters, that cannot hold a null value
The analysis then automatically inserts the appropriate null annotations in the detected locations.
To run a nullability analysis in Android Studio, select the Analyze > Infer Nullity menu option. Android Studio inserts the Android
@Nullable and @NonNull annotations in detected locations in your code. After running a null analysis, it's good practice to verify the injected annotations.
Note: The nullability analysis may insert the IntelliJ
@Nullable and @NotNull annotations instead of the Android null annotations. When running a null analysis, manually search and replace any IntelliJ annotations or includecom.intellij:annotations:12.0 as a compile dependency in your build.gradle file. This example includes the IntelliJ annotations 12.0 library as a dependency in the build.gradle file:dependencies { compile fileTree(dir: 'libs', include: ['*.jar']) compile 'com.android.support:appcompat-v7:22.0.0' compile 'com.android.support:support-annotations:22.0.0' compile 'com.intellij:annotations:12.0' }
Validating annotations
You can also manually add nullability, resource, and enumerated annotations throughout your code to perform validations for a variety of reference values, such as
R.string resources, Drawable resources, Color resources, and enumerated constants.
Run Analyze > Inspect Code to validate the configured annotations.
For a complete list of the supported annotations, either use the auto-complete feature to display the available options for the
import android.support.annotation statement or view the contents of the Support-Annotations library.
For more details about Android annotations, see Improving Code Inspection with Annotations.
Log messages
When you build and run your app with Android Studio, you can view adb and device log messages (logcat) by clickingAndroid at the bottom of the window.
If you want to debug your app with the Android Debug Monitor, you can launch it by clicking Monitor  in the toolbar. The Debug Monitor is where you can find the complete set of DDMS tools for profiling your app, controlling device behaviors, and more. It also includes the Hierarchy Viewer tools to help optimize your layouts.
in the toolbar. The Debug Monitor is where you can find the complete set of DDMS tools for profiling your app, controlling device behaviors, and more. It also includes the Hierarchy Viewer tools to help optimize your layouts.
No comments:
Post a Comment